How To Spray Paint Your T-Shirt With A Stencil
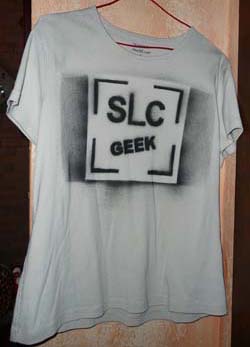 You are looking at my new SLC Geek t-shirt. I made it using a stencil and spray paint and you can do the same.
Materials:
- An idea
- T-shirt
- Adobe Photoshop
- Cardstock Paper (at least 110 lb. paper)
- Exacto Knife
- Shoebox (or something else to stretch the shirt around)
- Testers Spray Paint
Make A Graphic:
 I created this graphic in Adobe Photoshop. I was trying to make it look like the SLC Punk graphic from the movie. It’s not perfect, but it looks good enough to me. If you’re creative, you can make your own graphic or you can download mine. (If you live anywhere but Salt Lake City, I recommend changing the city name.)
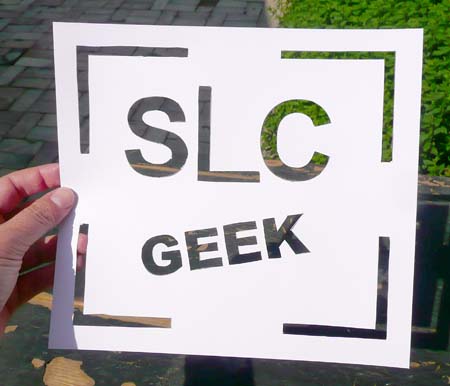
Download the graphic, print it up on card stock and use an Exacto knife to cut out the black bits. Here’s what it looks like once you’ve finished:
Here is a precise tutorial on how to create a stencil using Photoshop:
Spray Your Shirt:
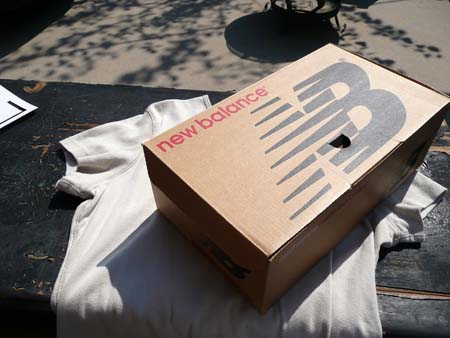
The next step is spraying your shirt using the stencil. You will need to stretch your shirt around something to keep it flat while you’re spraying. I used this shoebox, but you may need something different depending on the size of shirt:
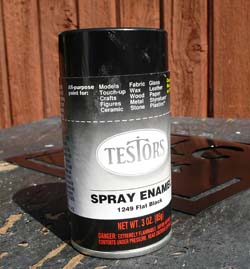 I used Testor’s spray paint because it was something that we already had in the house and the label said it worked on fabric.
One note of caution, we haven’t washed our shirt yet, so we have no idea what it will look like after a few washings. Considering the ink jet transfers are good for only one washing, I think the spray paint will be fair better.
We spray painted outside, but you could do it in your garage just as well. We just don’t like the fumes and we don’t have a garage.
We centered the shoebox in the shirt and placed the stencil on the front.
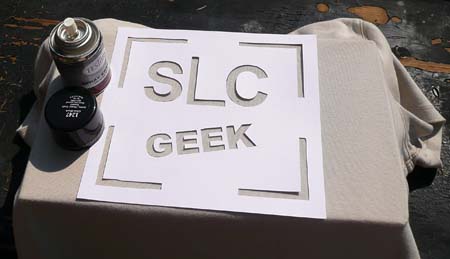
Spraying was fairly easy. Make sure you spray it from one side and then go around and spray it from the other side as well. The image will come out a little clearer this way.
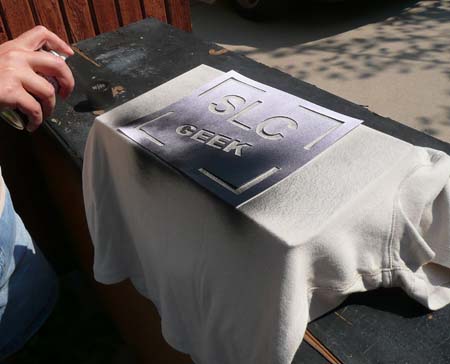
Once you’re sure that you have full coverage, you can remove the stencil and allow the paint to dry for one hour with the shoebox still inside the shirt.
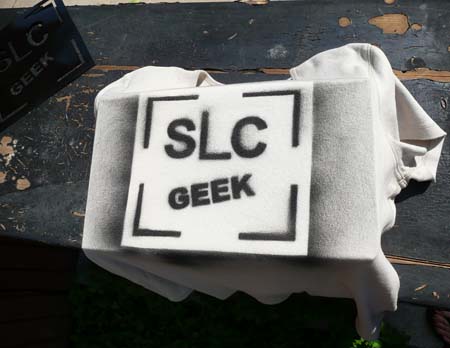
After that, it should be dry to the touch and you can hang up the shirt to dry for three more hours.
Other Ideas:
My shirt has the overspray around the stencil. I like that look and planned for it, but if you want something cleaner, you can attach paper to the edge of your stencil so there is enough coverage to prevent the overspray.
I only used one color of paint, but you can use many, creating a rainbow effect.
This stencil can be used to paint other things, like your walls or posters. I’ve seen people get old records from the thrift store and paint them with their stencils and hang them on their wall. You’re only limited by the law. Don’t paint things that you don’t own.
If you try this project, please leave a link on my comments so I can see all the creative things you are doing!
Update 09-22-07: We have washed this shirt and the Testers paint survives the wash just fine. Make sure you allow 24 hours of drying time before washing and make sure you wash it before you wear it (unless you like smelling like spray paint).

Cool! I like the overspray look too.
Comment by B. — 9/12/2007 @ 11:30 am
Jason needs a shirt like that. :)
Comment by Marleigh — 9/12/2007 @ 2:42 pm
I saw it in real life and thought you had bought it. You did a pretty good job!
Comment by Stacey — 9/14/2007 @ 9:50 pm
the overspray look is alright on some shirts but if you take some newspaper or something and put it under the edge of the stencil or even tape it on it looks so much cleaner ive been stenciling shirts for a few years now if you use spray adhesive on the back of the stencil to adhere it to the shirt it helps to stop the paint from getting underneath the paper also if you want to use the stencil more than once it helps to tranfer it onto a transparancy or something that holds together better than paper or if youre just to lazy after each use of the stencil turn it over and give the back side a coat it helps to hold it together
Comment by dallas — 10/27/2007 @ 11:56 pm
I’ve thought about doing this as well – trying to get shirts done on the cheap. My only concern is how many times you can wash the shirt. Any idea how long the paint lasts through washing and drying?
Thanks for posting this!
Comment by Scott — 1/16/2008 @ 11:53 pm
Scott,
I’ve washed that shirt at least five or six times and I haven’t had any problem with losing the color.
One note, however, you cannot spray light colors on dark material. No matter how many coats you put on, it doesn’t show up. For dark shirts, I bought white fabric paint at the craft store and dab it over the stencil with a stencil brush. That works MUCH better than spray paint.
Additionally, Dallas’ recommendation of using transparency sheets is a good one. The paper doesn’t last long when you use fabric paint, but the transparency sheets are impervious and can be washed when you’re done.
Best, Laura
Comment by Laura Moncur — 1/17/2008 @ 7:15 am
you can heat seal these stencils. get waxed paper put it on the shirt when the image is dry, use an ordinary iron and go to town. it only takes about 30 seconds and youll see the excess paint in the waxed paper when you take it off. it lasts way longer. and spray adhesive sticks to the shirt and gums up. it sucks. use a thin double sided tape like carpet tape. put it on the back of your drawing then cut it out with the exacto knife (#11 blade) un peel the other side and put it on the shirt. gives a good clean edge.
Comment by DUST — 3/4/2008 @ 2:38 pm
heyyy, i actually just made my first stencil project last night, but i used spray fabric paint instead of just regular spray paint. i like it because it doesn’t have a strong smell, but i guess either way is fine. i like your shirt and you gave really simple instructions. it would have been cool to read what you said before doing mine :]
Comment by Cristina — 4/24/2008 @ 12:05 pm
does it come off in the wash… sorry if that’s a really obvious answer :S
xx
Comment by KellieAnn — 5/22/2008 @ 11:22 am
KellieAnn,
I’ve been wearing and washing that shirt for eight months now and it hasn’t washed out or faded at all.
Laura
Comment by Laura Moncur — 5/23/2008 @ 10:04 am
Nice T Shirt I am going to try it myself. Do you think oak tag would work good for a stencil, you know the tan thick paper/cardboard type of thing? AWESOME! Btw everyone that spray paint is like the best for lots of things.
Comment by Tristin — 9/19/2008 @ 3:22 pm
hi,i have this black shirt, and tried fabric spary paint’pink’ and thought it was going to work, but it didnt. im going back to the store today, and dont know what im going to get. i read in another note that you should use fabric paint and dab it over the stencil. would the pink fabric paint work then?
Comment by Tiffany — 9/21/2008 @ 9:08 am
Light colored fabric paint WILL cover dark colors. I put white fabric paint on my red shoes and it works just fine.
Comment by Laura Moncur — 9/21/2008 @ 7:15 pm
Another tip is to draw or print your design on paper,then laminate the design, using a laminate sheet and laminate machine. (they dont cost a lot nowadays) then cut out your design/stencil,your stencils are then much hardier, and can be used several times easily! jake
Comment by jon burnley — 10/17/2008 @ 3:27 am
I make shirts using light cardboard and regular spraypaint. Turn them inside out and hand wash them…they’ll last a long time. And here’s a little trick, if you want a pro look, spray the back of the stencil with spray adhesive (get it a walmart). Snack boxes and cereal boxes work great for making stencils. And the best part is you get to rock your own designs!!
Comment by Eric D — 10/23/2008 @ 8:41 pm
…ssstencil! yeah! :D
Comment by Fabio Sassi — 10/27/2008 @ 1:55 am
I have been making shirts for just a short while, but i found something that works great for stencils.
It’s called MYLAR. Kind of like transparencies paper you would use for overhead projectors.
I picked some at a local Michael’s. $12 for 25 sheets. The great thing about mylar is that you can keep using it over and over and over…cause it’s plastic.
you’ll need a hobby knife to cut out our stencils, but those are only a few bucks at the hardware store.
As for applying the stencil. I spray the back of the stencil with a little bit of spray adhesive, that keeps the paint from seeping underneath the stencil, giving your image sharp, crisp edges…if that’s what you want.
Check out my blog: http://www.recycledbtq.blogspot.com
Comment by Josh — 1/12/2009 @ 2:58 pm
were can i buy fabric spray
Comment by shabeer — 2/15/2009 @ 1:20 pm
Shabeer,
For this project, I used Testor’s spray paint, which isn’t meant for fabric, but the dark colors work nicely on light fabric. Not the case for white paint on dark colors, however.
I found fabric spray paint at Joann Fabric and Craft Store. If you don’t have a Joann store in your area, they have a wide range of fabric paints and markers online here:
You have to scroll down the list to the third page to find the fabric spray paint, but it’s there.
Best,
Laura Moncur
Comment by Laura Moncur — 2/16/2009 @ 10:07 am
i just get a laminator sheet that you laminate things in and laminate it with nothing in then put it over my design and cut it out useing a stanley knife it makes it alot esier
Comment by god — 3/17/2009 @ 11:16 am
Just wondering about using spray adhesive. I am planning on using two different color paints, and need to place a stencil over one color while I spray the other. I am wondering if the spray adhesive will fade or remove one color as I apply the other paint. Any ideas or suggestions?
Comment by Captainperry — 6/30/2009 @ 8:43 am
I think this is a great idea and the fact people are making it come out less in the wash is brilliant! These are great for something like a small business and you want to sell some clothing for advertisment. Great Idea..I tried this, the tshirt is still as clean after about 10 washes not faded. As the other one which I have had for about 11 months is slightly fading but it’s lasted a long while..I have also been working on trying to perfect it so it doesn’t come out at all in the wash..I have also found out that besides fabric spray paint matte paint is the second best thing.. Great work!
Comment by Chris — 9/14/2009 @ 6:23 pm
Awesome! Just what I was looking for. Also, there is temporary fabric adhesive that wouldn’t gum up the shirt. It’s about $15 for a can at a fabric store and works like a charm! You can also use freezer paper and iron it on papery side up instead. Freya
Comment by Freya — 10/29/2009 @ 10:37 pm
Great ideas! Thank you for taking the time to post. I have another question for you…. Is it possible to print small words and have them come out clean? Im talking 2 inches across and 1 inch long. Thanks in advance, Jane
Comment by Jane — 6/29/2010 @ 8:30 am
Jane,
Those letters in GEEK are about as small as you can go without it getting really foggy. If you use the sticky paper instead (single use only), then you’ll get cleaner letters, but you can only use it one time.
Laura
Comment by Laura Moncur — 7/8/2010 @ 9:30 am
Will a gold color show up on a navy blue shirt? And what about white?
Comment by heatherrene — 9/4/2010 @ 9:55 pm
what was the exact spray used. i tried 1 and it did wear off in the wash after the first time
Comment by jennifer — 11/26/2010 @ 2:11 pm
Use freezer paper!!!! Freezer paper is like waxed paper, but only on one side and it’s a little plasticy. Cut your stencil out of freezer paper and place the shiny side onto your fabric. Iron the paper for a few seconds until it adheres, then use any kind of paint you want. It’s good when you want details or small areas of color. When your paint has dried a little just peel the paper off. No residue at all and super clean lines. You can buy freezer paper in the grocery store near the waxed paper. Each stencil can be reused one or two times, but then loses its stickiness.
Comment by Jor funke — 11/11/2011 @ 6:17 pm
This is totally awesome. You can basically do any kind of design with it. But I just don’t like how the colour comes out if u use a washing machine, rather handwash the shirt, but it fades after some time :(
Comment by Reina — 6/22/2012 @ 1:18 pm
hey, i was thinking if i can use a picture instead of words…will it be nice?
Comment by Arivin Raj — 6/27/2012 @ 12:59 am
@Arivan Raj The stencil was pretty clear, so I’m sure you could use a picture stencil instead of letters.
Comment by Laura Moncur — 6/27/2012 @ 9:04 am
is there any other thing you could use if you dont have adobe photoshop
Comment by paige — 7/26/2012 @ 3:43 pm
Laura, this is a super helpful tutorial. thanks so much. i’m an slc’er also and just by coincidence on my search for tshirt art tutorials, i chose yours.
thanks all for the comments on how you’ve refined or changed your process and what worked or didn’t.
thanks laura, a.d.
Comment by a. d. — 10/6/2012 @ 3:01 pm